CUTVANE / Buyer resources
How to Mark Artwork Placement Across a Zip-Up Hoodie Before Sampling
A graphic can have the right overall width and still look uneven when a hoodie is zipped. Before you send the artwork, show which two points should line up, what you expect to see between them and where the maker should measure from. Those same marks give you a way to review the first sample.
Placement diagram · Open the sample checklist
Draw the hoodie with the zip closed
On the front view, draw a line down the center of the closed zipper. Mark the part of the graphic that the eye should follow from one panel to the other. If the design calls for a deliberate break or a step up on one side, draw that too. A centered logo alone leaves the maker guessing about the two inside edges.
Label the sides from the wearer’s point of view. On a front view, the wearer’s right appears on the left of the page. In our drawing, B1 and B2 mark the inner ends of the same upper edge. The design calls for those ends to sit at the same height when zipped. The open view identifies which half belongs on each panel.
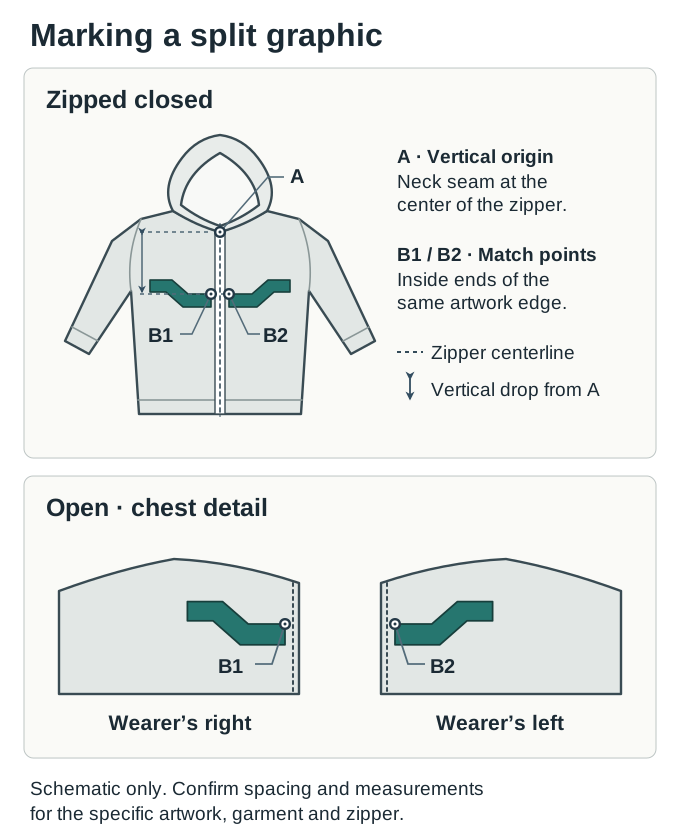
Original schematic. The upper edge aligns across the closed zip in this example. The drawing shows intent only. Agree the method, distances and tolerances for the individual project.
Open full-size diagramGive the sample maker repeatable measurements
Choose a point you can find on the drawing and on the garment. Here, A is where the neckline seam meets the center of the closed zipper. Give the vertical drop from A to the height of B1 and B2. For each side, give the horizontal distance from the zipper centerline to the marked inner end. Add the finished width and height of the full graphic. Put the units, sample size and artwork revision beside the measurements. If you require different artwork sizes for other garment sizes, list those separately. If the neckline construction hides A, agree on another visible starting point and mark it on both views.
Show which part of the zipper remains visible. If you also want a strip of plain fabric beside it, dimension that strip separately on each side and name the edge you measured from. Ask the maker to review the proposed method, spacing and acceptable variation against the actual fabric, artwork dimensions, zipper construction and wash or finish. Leave an undecided value marked “to confirm” until both sides agree.
Check the same points on the sample
Match the sample ID and size to the artwork revision. Lay the hoodie flat, close the zipper fully and let the fabric rest without pulling the panels into alignment. Take one straight-on photo of the whole front and one close-up of the join. With the same starting points and units as the drawing, record the actual height of each marked end and its distance from the centerline. A photo taken at an angle can make level edges look uneven. If the photo and the readings disagree, lay the sample flat and check again.
Open the zip to check that each half is on its intended panel and faces the right way. Close it again and note whether the pull catches the decoration anywhere along its travel. Record what you observed, the photo reference and any requested change. Attach the artwork version you reviewed to that decision. If a value is still open, name who will confirm it and what you want to see in the next sample.